
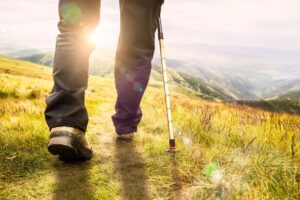
Strength Training To Reduce Knee Pain While Hiking
An online training client recently hiked two 14’ers while training to summit Kilimanjaro next summer. (For those who don’t live in the Rockies, that’s a mountain peak whose summit is 14,000 ft or higher.)
She reported that her hike to the dual summits went really well, but she complained of experiencing knee pain on the descent. She wanted to know if there were any exercises we could add to her training to reduce or entirely prevent this knee pain on future hikes.
This is a super common issue, and I’ll explain both why it happens, as well as how to structure your training to avoid this issue on your own hikes.
Hiking up a mountain is difficult on your muscles; they must overcome gravity to carry you UP the mountain, after all. You may notice your breathing becomes labored on your ascent due to your muscles’ increased demand for oxygen – the harder muscles work, the more oxygen they require to fuel your activity.
Hiking back down, on the other hand, is difficult on your joints, which take a beating on the way down a mountain because they’re absorbing your weight with each downward step. This can cause ankle, knee, and/or hip pain if your leg muscles aren’t strong enough to absorb those forces.
You can avoid joint pain* caused by descending mountains by improving your leg muscles’ ability to absorb force. In the gym, this is known as “eccentric” training.
Quick anatomy/physiology lesson: A concentric contraction causes muscles to shorten, thereby generating force, as in the contraction of your biceps while curling a dumbbell. Eccentric contractions cause muscles to elongate in response to a greater opposing force. (You can remember this by the “e” in eccentric and elongate.)
By training your leg muscles eccentrically, you’ll teach your body to effectively absorb force, which can help prevent joint pain while hiking.
The Exercises
Mini Band Walks
The gluteus medius muscle on the outer side of your hips is responsible for stabilizing the hip, knee, and ankle joints. When this muscle is weakened by prolonged sitting or lack of regular strength training, your joints may suffer.
You can strengthen your glute med with a simple mini resistance band. Loop the band around your knees (easier) or ankles (harder) and assume an athletic stance – hips and knees bent, as though you’re defending an opponent in soccer or basketball.
Take small steps side to side; avoid making large steps, as this will force your knees to cave in. While stepping side to side, keep your hips squared with your shoulders, your knees stacked above your ankles, and avoid movement above your hips by keeping your core engaged.
Perform 1-2 sets of 50 steps in each direction. If you don’t have enough space to complete 50 steps, take as many as you can one way, then come back the opposite direction and repeat until you hit the target reps.
Note: These are the bands I use.
Box Jumps with Emphasis on Landing Mechanics
Choose a low-ish box – one you are very confident you can easily jump onto. This isn’t about how high you jump, but rather, about landing softly.
Push your hips back to load your posterior chain, then jump explosively onto the box. Your goal is to land as softly as possible, making as little noise as possible. Land in a mini-squat so that your hips and knees are bent.
And remember – always STEP down from the box; do not jump down from it.
Complete 2-3 sets of 3-5 reps, resting for a full 60-90 between efforts. This may seem like an overly long rest period, but jumping requires fast-acting energy and is neurologically demanding. A longer rest period will ensure ample recovery to minimize your injury risk. There’s no point in hurting yourself while training to prevent injury, right?
Box Step Downs
The movement looks very similar to stepping down a steep slope, so it’s an incredibly functional exercise for hikers. Done correctly, box step downs will increase single-leg eccentric control, which is vital for hiking.
While this exercise is super simple to execute (even from home with little to no equipment), you shouldn’t be fooled by its simplicity – it’s tough!
Here’s how to properly execute box step downs:
Start with a very low step or sturdy box. We’re talking maybe 3-4″ in height. The lower the box, the easier the exercise. You can progress the exercise by using a taller box or by adding weight.
Stand on top of the step or box. Extend one leg straight in front of your body without shifting your hips. From this starting position, sit your hips back as though reaching for a chair behind you. As you sit back, focus on keeping your hips level and don’t let your heel lift off the box. If your heel comes up, you may lack the ankle mobility for this exercise and should use a shorter box.
Continue to sit your hips back until the heel of your extended leg touches the floor. Drive through your standing leg to return to the fully-upright starting position and repeat for 10-15 repetitions per leg. I recommend the 10-15 rep range for body weight.
Once you’re able to complete three to four sets of 10-15 reps with body weight (and good form!), you can progress the exercise either by using a taller step/box or by adding a weight to the exercise. Hold a dumbbell or kettlebell in the hand of your non-working leg. From there, work up to three to four sets of 8-12 weighted reps.
Accentuated Eccentric Leg Extensions
If you have gym access, the leg extension machine can be an awesome tool for building eccentric leg strength that will protect your knees while hiking.
Traditional leg extensions target the quadriceps (thigh) muscles. This nifty variation takes advantage of the fact that your muscles are stronger eccentrically (lowering) than concentrically (lifting).
Use both of your legs to lift the weight, which is the “hard part” of the exercise; then, remove one leg from the equation to make the eccentric, or lowering, portion of the exercise more challenging. This will improve your quad’s ability to manage eccentric forces similar to those experienced while descending a mountain.
Complete 2-3 sets of 8-12 reps with each leg. Start on the low end of that recommended rep scheme. Eccentric training can create a lot of soreness, and you want to be able to walk tomorrow!
General Strength Training
In addition to these specific exercises, anything that strengthens the quadriceps, hamstrings, and calf muscles will be beneficial for hiking. This includes squats, split squats, lunges, step ups, bridges, hip thrusts, deadlifts, kettlebell swings, calf raises, jumping rope, and sled pushes.
For pure strength, train in the 3-8 rep range with heavy weights; for strength-endurance, train in the 8-12 rep range with moderately heavy weights. Always use a load that you can control through the full range of motion.
Was this article helpful? Did it spark any questions about training for the mountains?
Please direct your comments/questions to info@kpxfitness.com and I will reply personally.
*Disclaimer: Always seek professional medical attention for pain/injury.